16 Master Your Space: Small Studio Apartment Layout Ideas
Walking into a new studio apartment can feel like opening a puzzle box. You see one room that needs to be your bedroom, living room, dining area, and sometimes even your home office all without looking like a storage unit exploded. The problem isn’t a lack of style; it’s a lack of strategy. Most small spaces feel cramped because layouts fight the room’s natural flow. The solution? Smart zoning, vertical thinking, and multi-purpose furniture. In this guide, you’ll get 16 small studio apartment layout ideas that actually work whether you love minimalist, boho, or modern industrial. Let’s turn your tiny footprint into a masterpiece.
1: The Floating Sofa Zoner
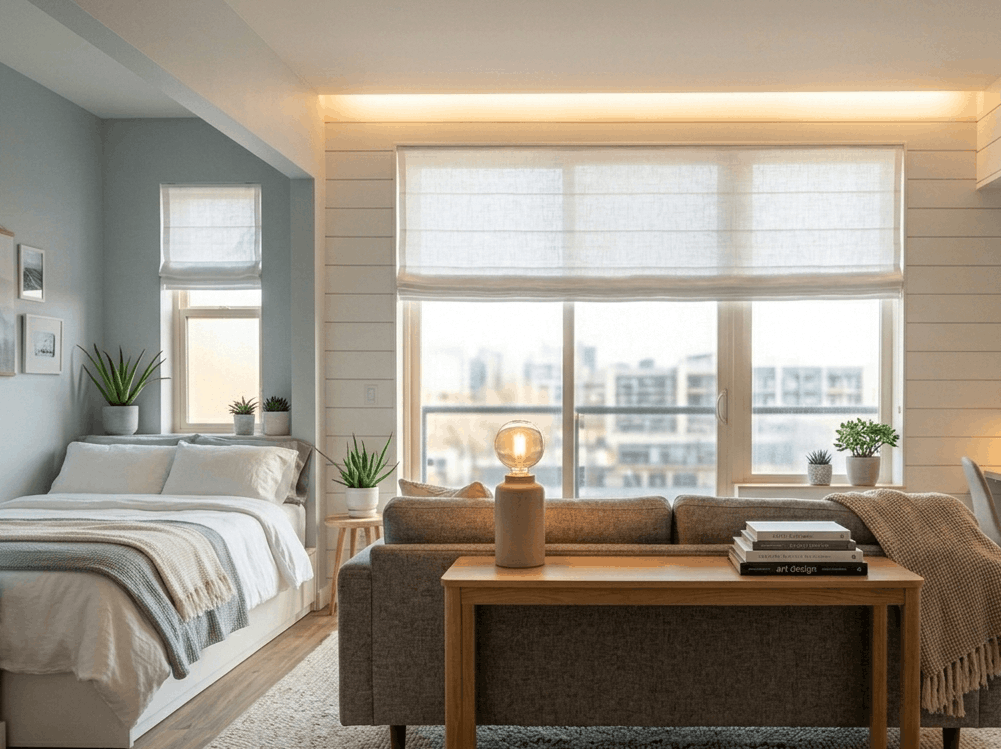
Instead of pushing your sofa against the wall, float it facing the main entry or window. This creates an invisible wall between your “living room” and “bedroom” area. Place a slim console table behind the sofa to anchor the zone and add storage for keys or books. The floating technique tricks the eye into seeing two distinct rooms, which reduces the studio “dorm room” feel. Pair with a small round rug under the sofa’s front legs to define the seating area even more.
Tips
- Leave at least 30 inches of walking space behind the sofa.
- Use a sofa with low back to keep sightlines open.
- Add a floor lamp near the sofa’s arm to reinforce the zone.
2: The Canopy Bed Curtain Divide
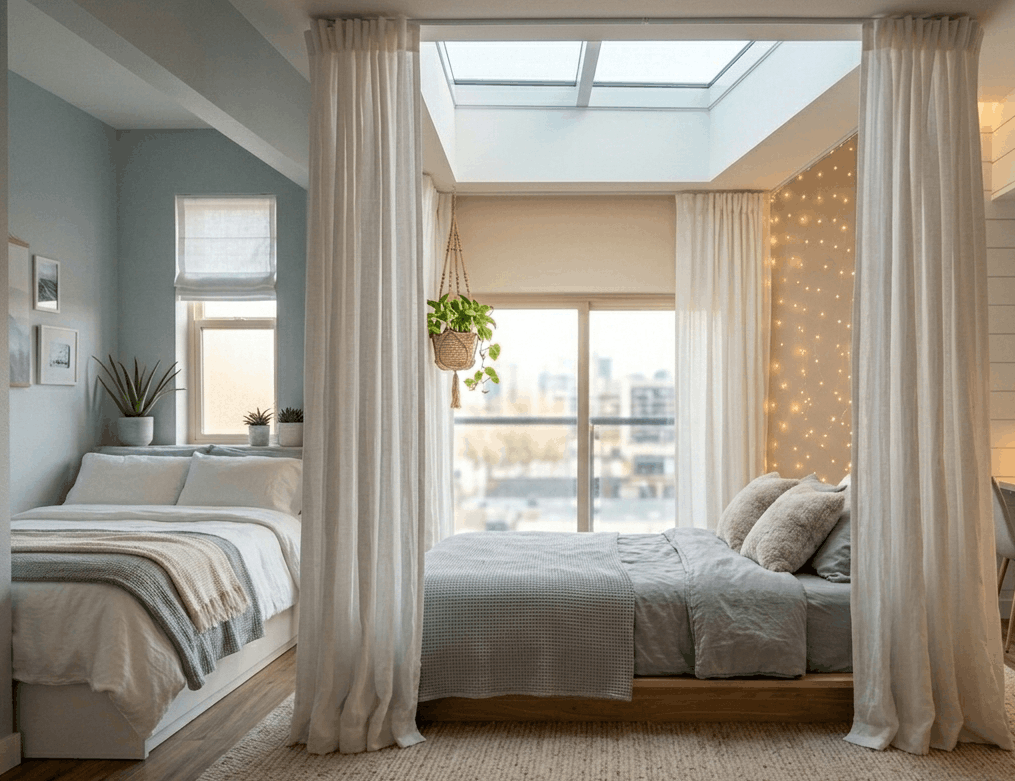
Hard walls are expensive, but curtains are genius. Install a ceiling-mounted curtain track between your bed area and the rest of the studio. Use floor-to-ceiling linen or cotton curtains that you can pull closed at night for privacy and open during the day to restore the full room. This small studio apartment layout idea keeps your bed feeling like a peaceful sanctuary rather than a couch-side afterthought. Choose light-filtering fabric so you don’t block natural light completely. For extra drama, backlight the bed area with a soft LED strip.
Tips
- Use a curved track to wrap around a corner bed.
- Pick neutral curtains to blend with walls.
- Hang the track 2 inches below the ceiling for height illusion.
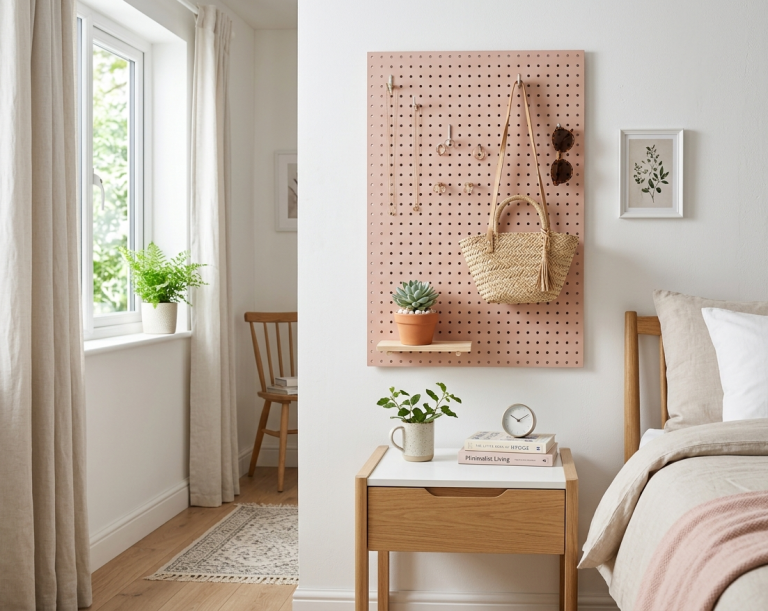
3: The Vertical Kitchen Extension

Most studio kitchens end abruptly. Extend yours visually by running open shelving or a pegboard up the wall in the same color as your cabinetry. Use the shelves for glass jars, plants, and daily dishes. Then, place a narrow bar-height table perpendicular to the kitchen counter. This creates a breakfast bar that doubles as a prep area and a subtle room divider. The vertical extension pulls the eye upward, making the whole studio feel taller and more deliberate. Add under-shelf LED lighting to keep it bright and functional.
Tips
- Match shelf color to walls for a seamless look.
- Store only beautiful items on open shelves.
- Use bar stools that tuck completely under the table.
4: The Murphy Bed Library
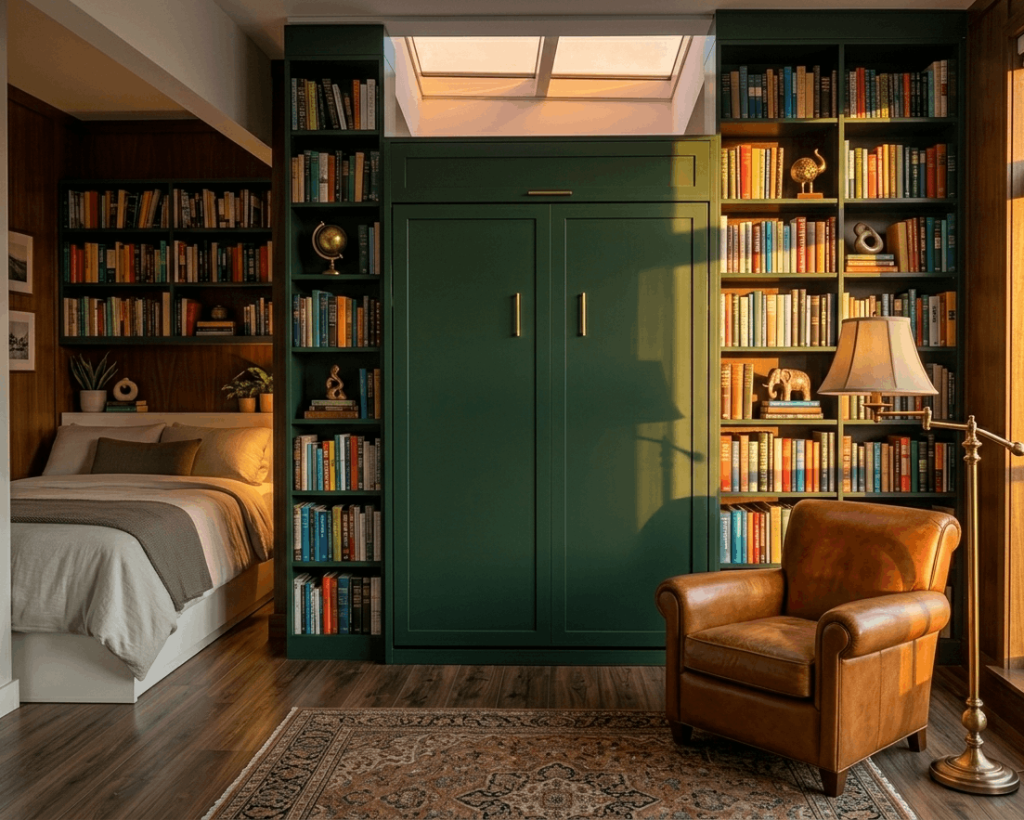
A Murphy bed is classic, but a Murphy bed framed by built-in bookshelves is magic. Install floor-to-ceiling bookshelves on both sides of the bed cabinet. When the bed is folded up, the wall becomes a dramatic library with a small desk or reading chair in front. When bedtime comes, fold down the bed and the shelves become nightstands. This layout works best on the longest wall in your studio. Paint the entire unit the same color as the wall so it disappears when not in use.
Tips
- Install dimmable sconces on the shelves for reading light.
- Leave one shelf open without backing to pass light through.
- Use a bed with integrated storage drawers beneath.
5: The Corner Office Sleeper
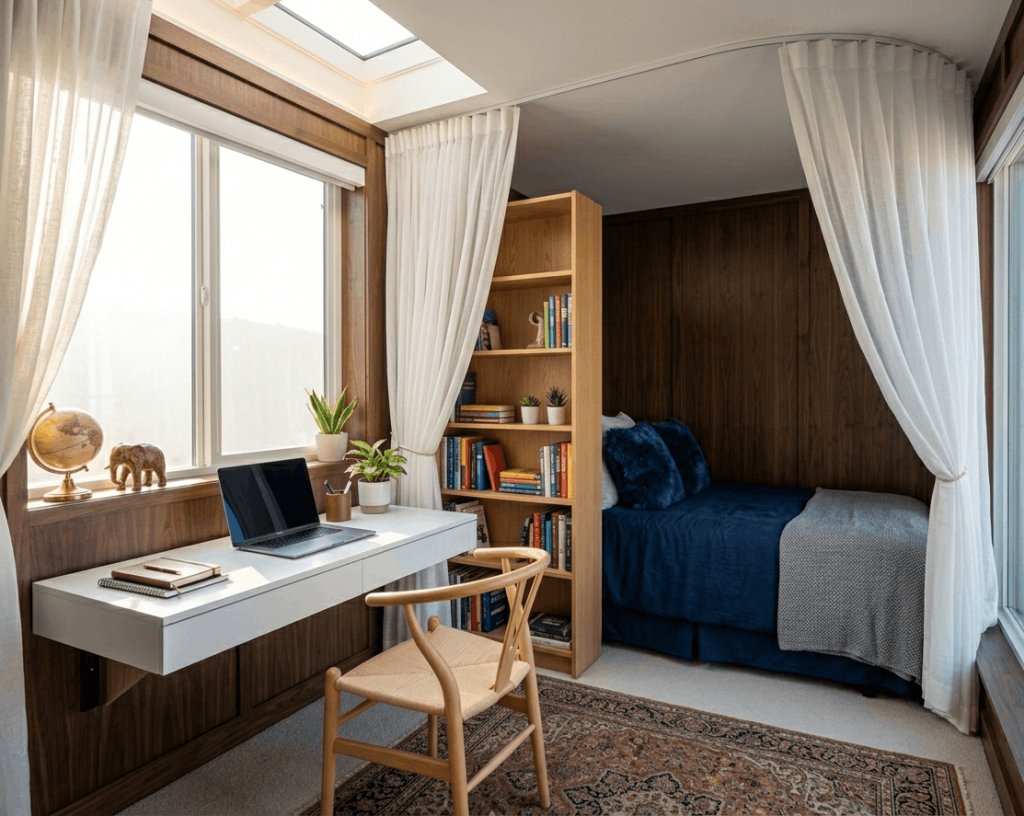
Work-from-home life meets small studio living. Place your bed in one corner (headboard against two walls) and use the opposite corner for a desk. Then, install a ceiling-mounted tension rod with a sheer curtain that can separate the two corners when needed. Between the bed and desk, put a tall bookshelf turned sideways to act as a partial visual block. This small studio apartment layout lets you “leave the office” simply by drawing a curtain. Use a bed with storage drawers underneath to store office supplies.
Tips
- Face your desk toward the room, not the wall.
- Use a wall-mounted desk to save floor space.
- Add a small corkboard behind the desk for personality.
6: The Mirror Wall Illusion
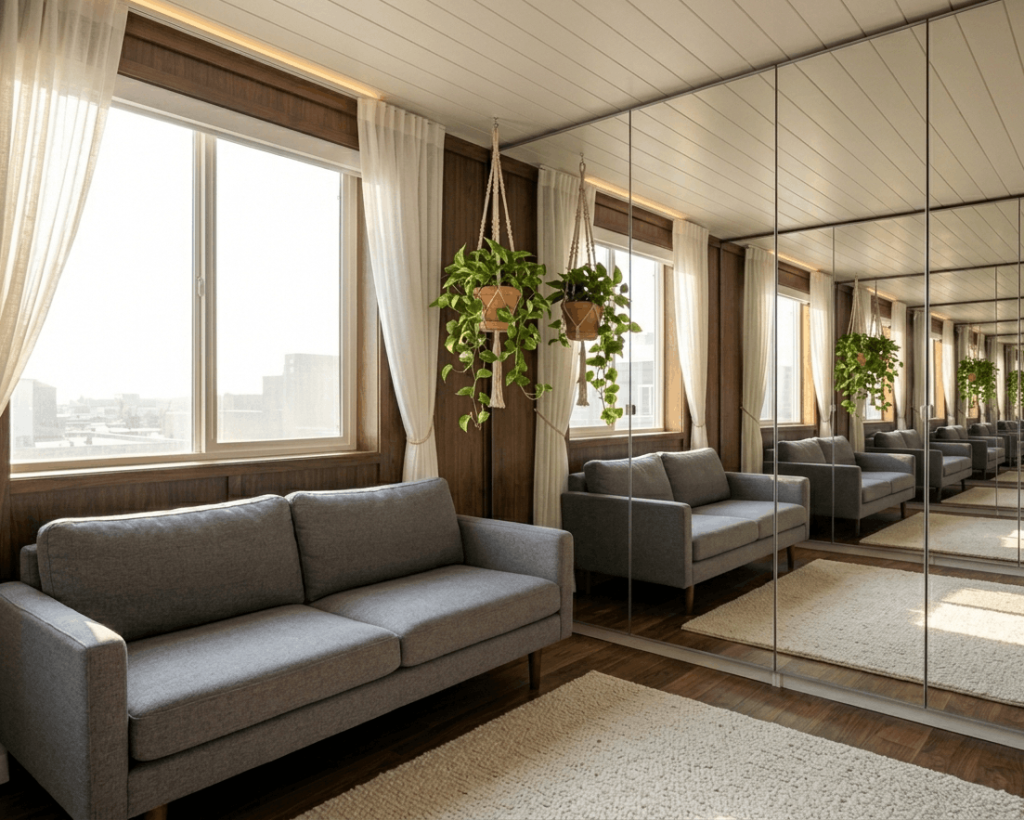
Nothing expands space like mirrors. Cover one entire wall preferably the one opposite your main window with large, frameless mirror panels. This instantly doubles the visual depth of your studio. Place your bed or sofa against the adjacent wall so the reflection shows the whole room. For a softer look, use arched floor mirrors leaned side by side. The mirror wall also bounces natural light deep into corners, reducing the need for harsh overhead lighting. Just avoid placing mirrors directly facing your bed if you prefer a calmer sleep environment.
Tips
- Use stick-on mirror tiles for renter-friendly installs.
- Clean mirrors weekly to maintain the illusion.
- Pair with a small plant reflected in the mirror for life.
7: The Lofted Sleeping Nook
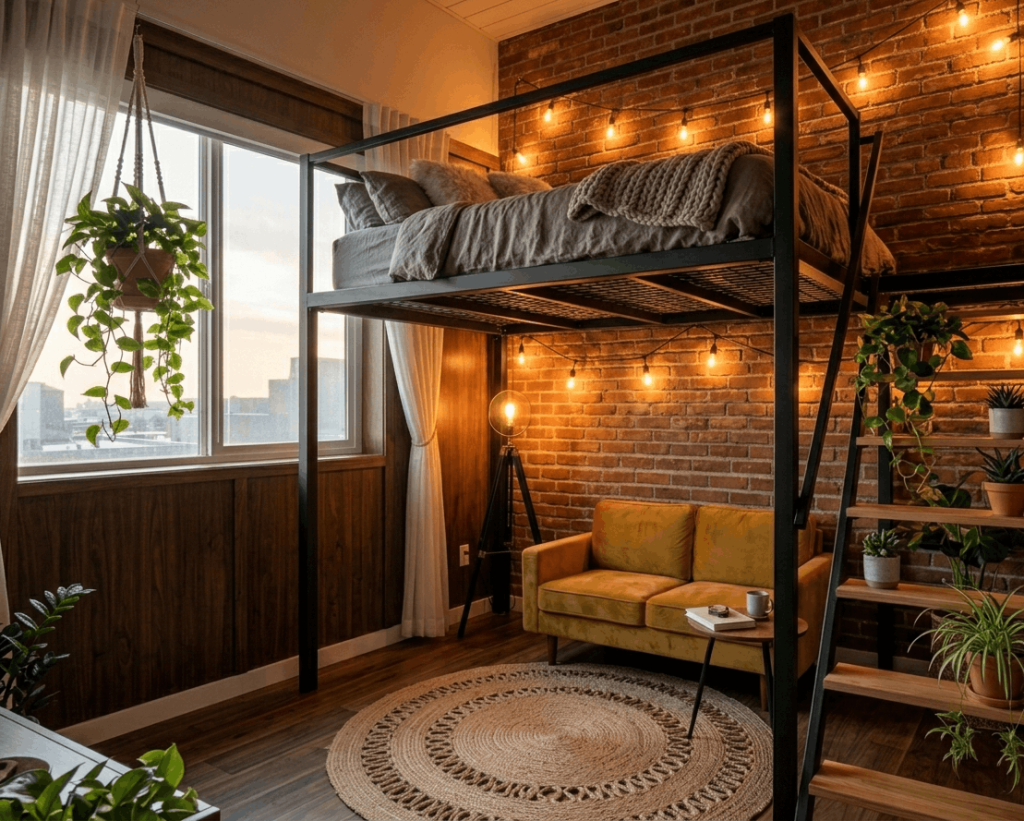
If your studio has high ceilings (8.5 feet or more), build or buy a lofted bed frame. Place the bed up high and use the space underneath as a living room or office. A small loveseat, a floor lamp, and a rug fit perfectly under a lofted twin or full bed. Add a sturdy ladder and a guardrail for safety. This small studio apartment layout gives you two functional floors in one room. Paint the loft frame the same color as your walls so it feels like architecture, not furniture.
Tips
- Leave at least 4 feet of headroom under the loft.
- Install a dimmable light under the loft for the living area.
- Use the loft’s side rails as bookshelves.
8: The Rug Layering Zone System

You don’t need walls to define spaces just rugs. Lay a large neutral jute rug across most of the studio as your base. Then layer a smaller, colourful rug on top for your living area. For the bedroom zone, place a third rug maybe a fluffy sheepskin or flat weave under the lower two-thirds of your bed. The eye instantly reads each rug as its own room. Keep the colour palette cohesive: base rug in beige or gray, top rugs in complementary blues, greens, or terracotta.
Tips
- Use rug tape to prevent tripping.
- Leave 6 inches of floor visible between rugs.
- Vacuum layered rugs weekly to avoid dust buildup.
9: The Window Bench Storage Combo

Most studio windows have empty space beneath them. Build or buy a low bench that fits perfectly under your window, with lift-up seats for storage (blankets, shoes, off-season clothes). Then, place your bed or sofa perpendicular to the bench so the bench acts as a side table and extra seating. If your bed is nearby, the bench becomes a place to put on shoes or read. Paint the bench the same color as your trim so it looks original to the apartment. Add a padded cushion for comfort.
Tips
- Use bench depth of 16–18 inches.
- Install soft-close hinges to avoid noise.
- Add two small pillows to make it inviting.
10: The Bifold Screen Bedroom
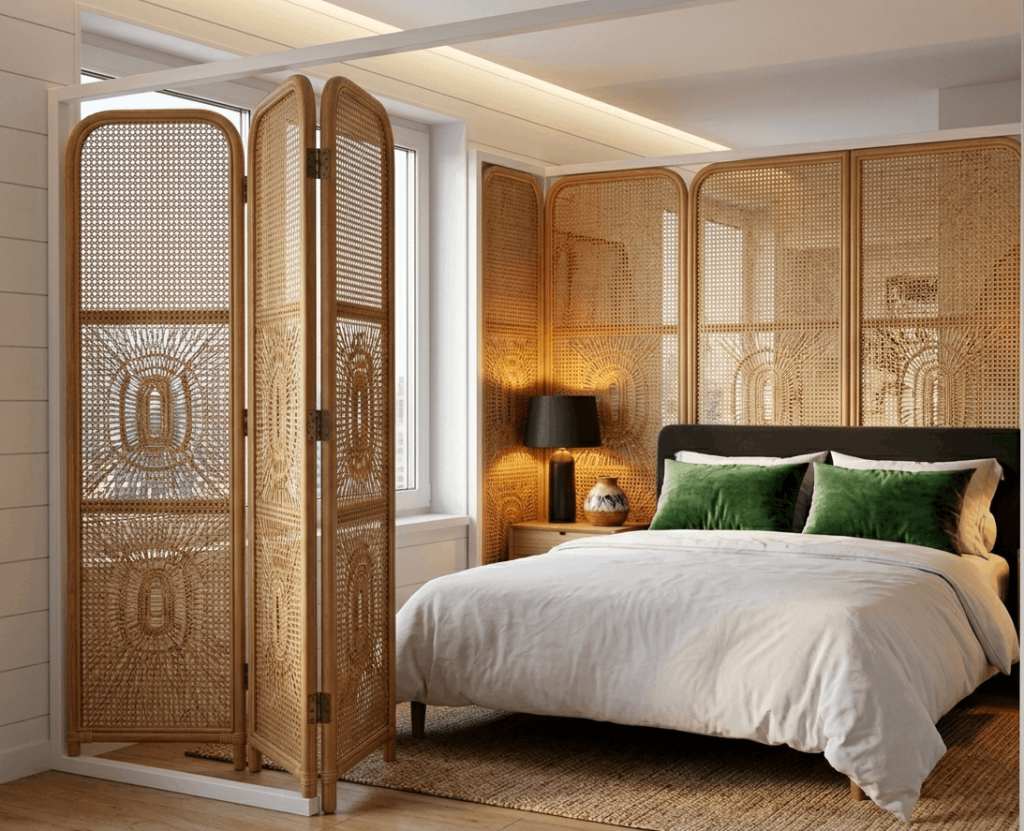
For renters who can’t install ceiling tracks, a three-panel bifold screen is your best friend. Place the screen around three sides of your bed, leaving the foot open for entry. Choose a screen with rattan, wood, or fabric that matches your decor. This small studio apartment layout creates a cozy “room within a room” without any permanent changes. During the day, fold the screen flat against the wall to regain open space. For added function, hang small hooks or a jewelry organizer on the inside panels.
Tips
- Choose a screen at least 70 inches tall.
- Weight the bottom with sandbags if unstable.
- Use two screens for a full enclosure.
11: The Gallery Wall Pathway
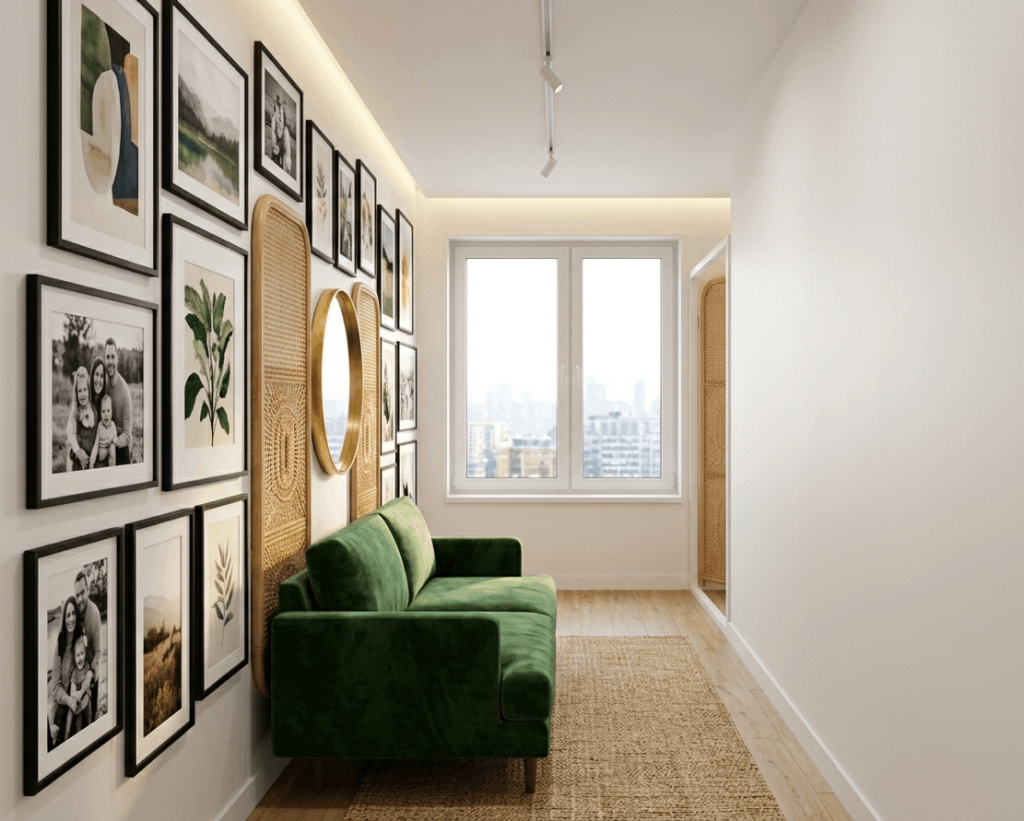
Long, narrow studios feel like hallways. Break that visual tunnel by creating a gallery wall on one long wall and keeping the opposite wall nearly bare. Arrange art, mirrors, and small shelves in a clustered but balanced way from one end of the studio to the other. This draws the eye sideways (across the art) rather than straight down the length of the room. Place your furniture perpendicular to the gallery wall so you face the art. The path between furniture becomes a deliberate walkway instead of leftover space.
Tips
- Use matching frames for a cohesive look.
- Include one large mirror to reflect the opposite wall.
- Leave 4 feet clear for the walking path.
12: The Under-Bed Drawer Kingdom
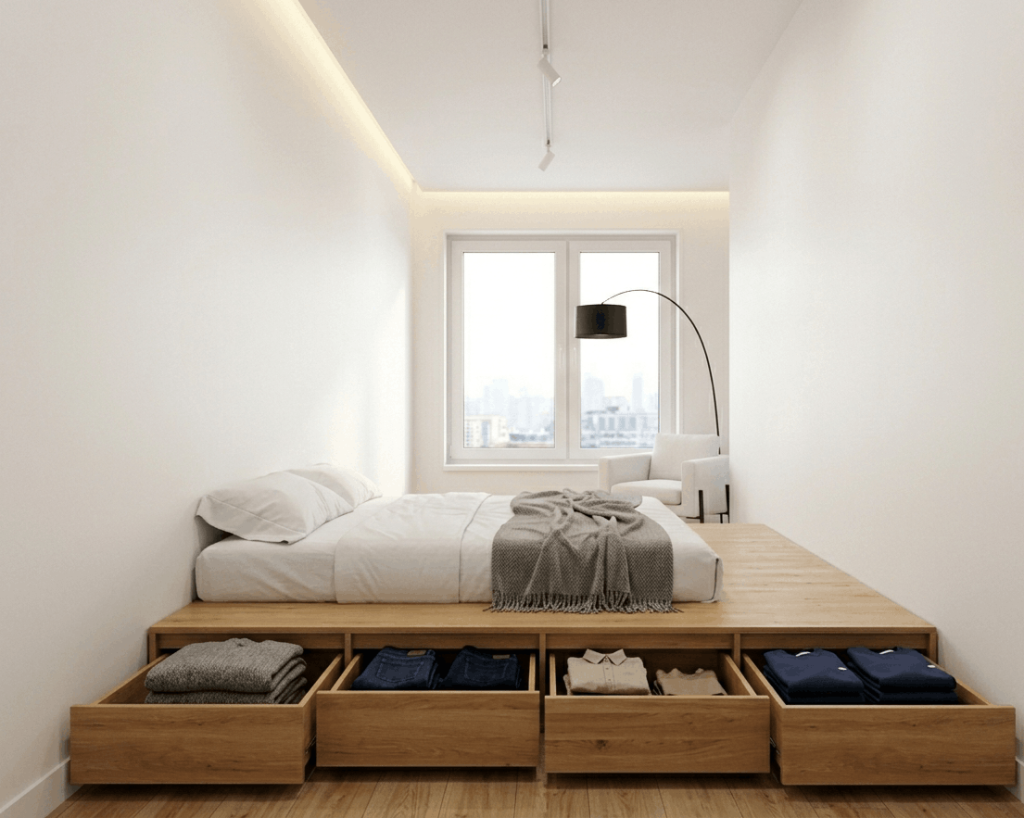
Clutter kills studio layouts. Build or buy a platform bed with deep, wheeled drawers underneath. Use them for clothes, shoes, linens, and even pantry items. Then, because your storage is hidden, you can keep the rest of the studio nearly empty. Place your bed against the longest wall and leave the opposite wall completely free of furniture except for a single chair and floor lamp. This extreme minimal layout works because your storage is literally under your sleeping surface. Add drawer dividers to keep categories separate.
Tips
- Measure drawer height for boots or sweaters.
- Use felt liners to reduce noise.
- Label drawer fronts discreetly on the inside.
13: The Drop-Leaf Table Transformer
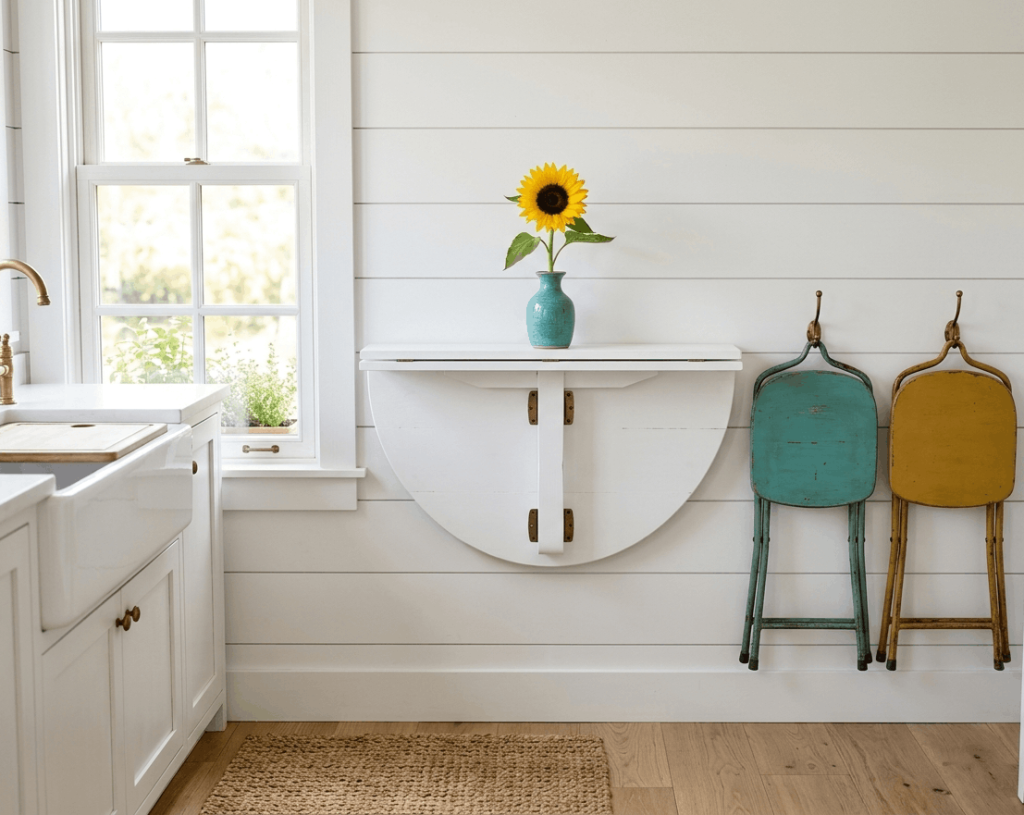
Dining areas eat up square footage. Instead, install a wall-mounted drop-leaf table on the wall opposite your kitchen. Keep both leaves down 90% of the time it becomes a slim console for keys and mail. When you eat, lift one leaf for a two-person breakfast bar. Lift both leaves for a four-person dinner table. Place two folding stools nearby that hang on wall hooks. This small studio apartment layout idea gives you a full dining room in under 3 inches of wall space when closed.
Tips
- Install table at 30 inches high (standard dining height).
- Use a magnetic strip underneath to hold napkins.
- Choose a table with a lip to prevent spills.
14: The Headboard Room Divider

Most headboards go against a wall but yours can float. Buy a tall, solid headboard (at least 48 inches high) and position your bed so the headboard faces the living area. The back of the headboard becomes a natural room divider. Paint or wallpaper the back of the headboard to make it a feature. On the living side, place a slim sofa table against the headboard with a lamp and plant. This creates a solid visual barrier while using zero extra floor space.
Tips
- Anchor the headboard to the floor or bed frame.
- Add hooks on the living side for coats.
- Use a headboard with built-in shelves for extra function.
15: The Monochrome Disappearing Act

Paint your walls, trim, ceiling, and furniture all the same colour preferably a soft off-white, light gray, or warm beige. This small studio apartment layout trick makes edges disappear. Your bed frame, bookshelf, and desk visually melt into the walls. Then, use only two accent colours in small doses (like a green pillow and a brass lamp). The lack of contrast reduces visual noise, so the room feels twice as large. Add texture through rugs and linens to keep it from feeling flat.
Tips
- Match paint sheen: matte on walls, satin on furniture.
- Use one accent color for all art frames.
- Keep flooring light and continuous.
16: The Swing-Arm Sconce Layout
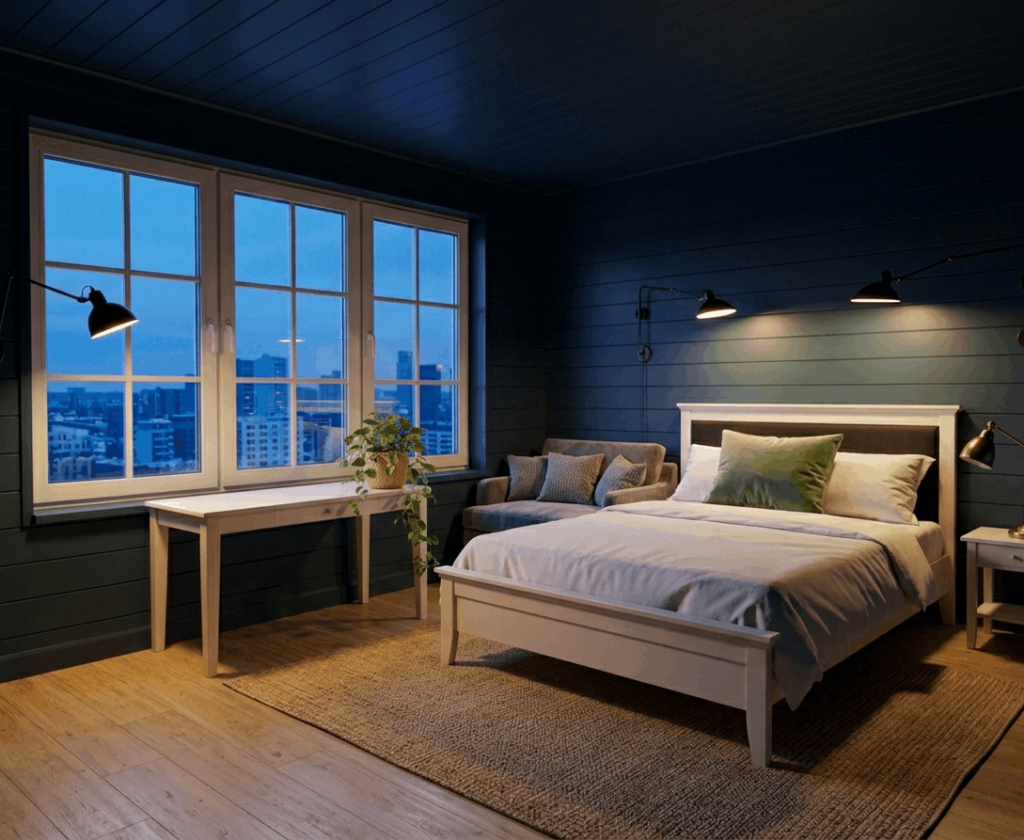
Lighting defines zones better than furniture. Install two swing-arm wall sconces on the wall above your bed’s headboard. Then, mount a third swing-arm sconce on an adjacent wall, aimed at your sofa or desk. When you swing the sconces toward the bed, that zone lights up. Swing them toward the sofa, and the living area activates. This allows you to change the “mood zone” without moving a single piece of furniture. Use dimmable LED bulbs and plug-in sconces if you can’t hardwire.
Tips
- Mount sconces at 60 inches from the floor.
- Choose sconces with long arms (at least 18 inches).
- Use warm 2700K bulbs for a cozy feel.
Conclusion
Your studio apartment isn’t a limitation it’s a design challenge you can absolutely win. By using floating furniture, curtains, rugs, mirrors, and smart storage, you can create separate zones for sleeping, living, working, and dining without losing an inch of openness. Start with one or two of these small studio apartment layout ideas, test how the flow feels, and build from there. Which idea will you try first? Drop a comment below I’d love to hear how you master your space.
FAQs
What is the best layout for a small studio apartment?
The best layout uses zone definition without permanent walls. Float your sofa facing the entry, place your bed in a corner or behind a curtain, and use rugs to anchor each zone. Always prioritize clear walking paths of at least 24–30 inches.
How do you separate a bedroom in a studio apartment?
Use ceiling-mounted curtains, a bifold screen, a tall bookshelf turned sideways, or a floating headboard. For renters, tension rod curtains or folding screens are best because they leave no damage.
What color makes a studio apartment look bigger?
Soft off-white, light beige, pale gray, or any light monochromatic scheme. Paint walls, trim, and ceiling the same color to blur edges. Save bold colors for small accents like pillows or art.