15 Easy DIY Dorm Room Decor Ideas
Walking into a bare, cookie-cutter dorm room can feel overwhelming. The white walls, the plain furniture, the complete lack of personality it’s enough to make any student miss home. But here’s the truth: you don’t need a big budget or permanent changes to create a space you love. With a few clever DIY projects, you can add warmth, color, and function to even the tiniest room. This guide shares 15 easy DIY dorm room decor ideas that are renter-friendly, budget-conscious, and seriously stylish. From no-damage wall art to storage hacks, let’s turn that blank box into a cozy sanctuary.
1: Command Hook Curtain Rod

Dorm windows usually come with sad, plastic blinds. Adding soft curtains instantly makes the room feel warmer and more private. The trick? Use Command hooks instead of a real curtain rod. They hold lightweight curtain rods or even just clip rings with fabric panels. This method leaves zero damage and takes five minutes to install.
Tips
- Choose blackout curtains for better sleep during daytime naps.
- Pick a rod that’s lightweight plastic or thin metal.
- Use 4–6 heavy-duty Command hooks depending on curtain weight.
2: Peel-and-Stick Wall Panels

Instead of fighting your dorm’s no-paint rule, add texture with peel-and-stick wall panels. These come in faux brick, shiplap, or 3D geometric designs. They stick directly to clean walls and peel off without residue. Focus on one accent wall like behind your bed or desk to make a big impact without spending much.
Tips
- Test a small corner first to ensure the adhesive won’t damage paint.
- Use a credit card to smooth out air bubbles.
- Cut panels with scissors for a perfect fit around outlets.
3: DIY Headboard from Cardboard

A headboard makes any bed feel like actual furniture. Cut a large piece of strong cardboard into a rectangle or arch shape. Wrap it with quilt batting and a pretty fabric (use a staple gun or strong tape). Lean it against the wall behind your mattress. It weighs almost nothing, costs under $15, and looks custom-made.
Tips
- Use foam board for a sturdier, reusable option.
- Choose fabric that matches your bedding for a cohesive look.
- Add ribbon or twine tufting for extra charm.
4: Pool Noodle Lighting Diffuser

Harsh overhead fluorescent lights are the enemy of good vibes. Slide a pool noodle (cut lengthwise) over a strip of LED string lights. The foam diffuses the light into a soft, glow-like effect. Attach the noodle to the ceiling with Command strips for an instant cloud-light look. Total cost: about $5.
Tips
- Use a white pool noodle for the softest diffusion.
- Pair with warm white LEDs (not cool white).
- Run the cord along the ceiling corner to hide wires.
5: Crate Nightstand

One wooden or plastic crate (from craft stores or even a grocery store) turns into the perfect nightstand. Stand it upright or on its side. Add a small lamp, phone charger, and a few books. Stack two crates for more storage. Stain or paint them to match your room’s colors. Functional, portable, and under $10.
Tips
- Zip-tie crates together if stacking for stability.
- Use a crate on its side to store shoes or blankets.
- Add adhesive felt pads to protect the floor.
6: Washi Tape Art Wall

Create an entire gallery wall without nails, tape marks, or frames. Use colorful washi tape (removable paper tape) to make geometric shapes, a faux headboard outline, or a “frame” around posters. You can also tape up photos and postcards directly. When move-out comes, the tape peels off without residue.
Tips
- Stick with 2–3 tape colors for a clean look.
- Use painter’s tape as a cheaper alternative.
- Change the design every month for a fresh feel.
7: Over-the-Door Shoe Organizer (For Everything but Shoes)

That clear plastic shoe organizer with pockets? Hang it on the back of your closet or room door. Use the pockets for snacks, school supplies, toiletries, chargers, or small decor items like fake plants. It’s the ultimate vertical storage hack and costs about $10.
Tips
- Label pockets with masking tape so you remember what’s where.
- Use it for makeup brushes and hair tools near your mirror.
- Cut the bottom few pockets off if it hangs too low.
8: Clipboard Vanity Mirror Frame

Take a plain wall mirror (often provided in dorms) and clip on four small clipboards one on each side. Use the clipboards to hold printed photos, to-do lists, inspirational quotes, or jewelry. It turns a boring mirror into an interactive vision board. Plus, you can swap out the photos weekly.
Tips
- Spray paint the clipboards gold or black for a polished look.
- Use mini clipboards for smaller mirrors.
- Add a small shelf below the mirror for makeup.
9: Fabric-Covered Cork Board

Buy a basic cork board ($5–10) and cover it with a pretty fabric using a staple gun. The fabric hides pushpin holes and adds color. Mount it with Command picture-hanging strips. Use it for photos, class schedules, and small mementos. It’s softer and prettier than a bare cork board.
Tips
- Stretch the fabric tight before stapling to avoid wrinkles.
- Use thin cotton or linen thick fabric hides pins.
- Add ribbon in a crosshatch pattern for a chic look.
10: Mason Jar Desk Organizer

Clean a glass mason jar (or any pasta sauce jar). Wrap twine around the neck or paint the inside with chalkboard paint. Use one jar for pens and pencils, another for makeup brushes, and a third for fake flowers. They’re heavy enough not to tip over and look intentionally vintage.
Tips
- Glue the jar to a small wood circle base for stability.
- Use command strips to attach a jar lid to the underside of a shelf then screw the jar in for hanging storage.
- Fill with fairy lights for a glowing centerpiece.
11: Tension Rod Under-Sink Storage
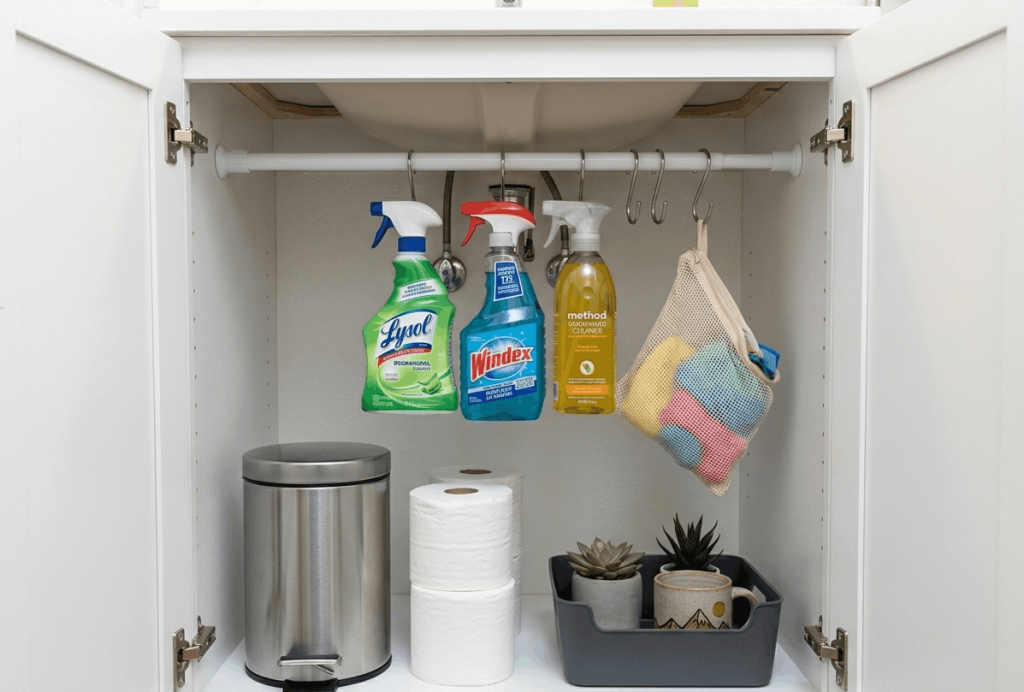
Most dorm sinks have an open cabinet below with wasted vertical space. Install a small spring tension rod inside the cabinet. Hang spray bottles, cleaning wipes, or even a small shower caddy from the rod using S-hooks. This doubles your storage instantly and costs under $10.
Tips
- Use multiple rods stacked vertically for tiers.
- Hang a mesh bag from the rod for sponges.
- Measure your cabinet width before buying the rod.
12: Pillowcase Laundry Hamper
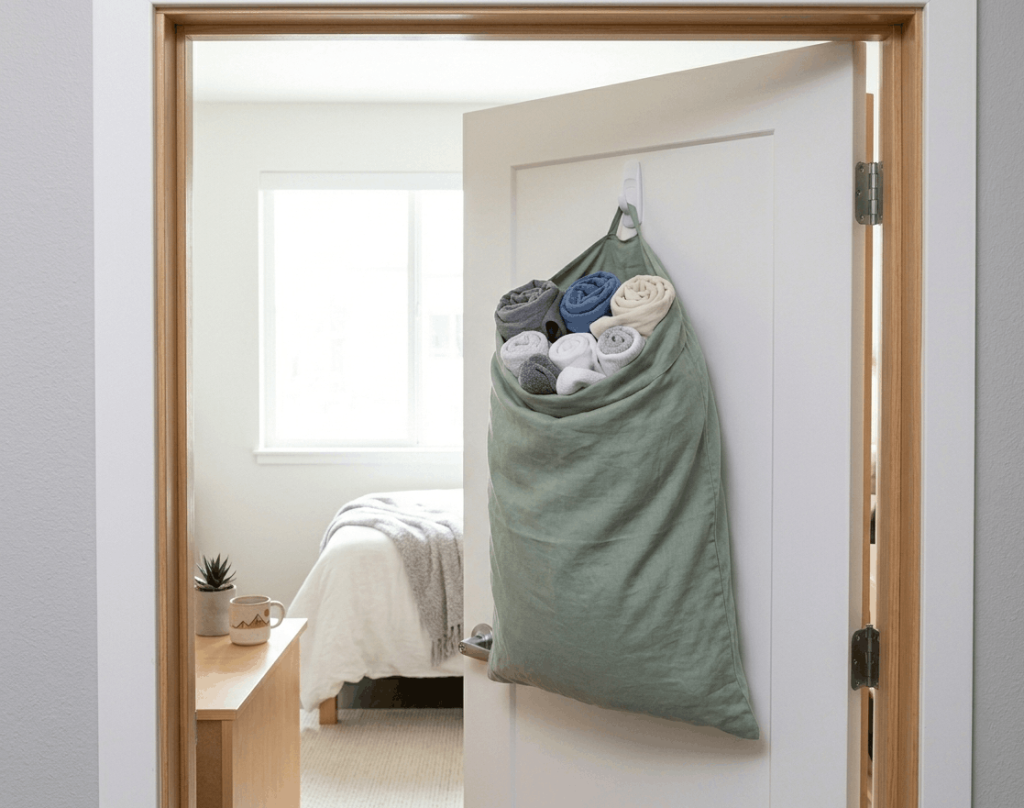
Instead of buying an ugly plastic hamper, use a large decorative pillowcase as a laundry bag. Drape it over a Command hook on the back of your door or closet. When it’s full, just grab the pillowcase and go to the laundry room. It’s soft, washable, and matches your bedding.
Tips
- Use a king-size pillowcase for more capacity.
- Sew or tie a drawstring closure at the open end.
- Keep a second pillowcase for clean clothes storage.
13: String Light Photo Clips

String fairy lights across your wall or above your bed. Clip small photos, ticket stubs, or postcards directly to the light string using mini wooden clothespins. It doubles as warm lighting and ever-changing wall art. No tape, no frames, no damage.
Tips
- Use battery-operated lights with a remote for easy on/off.
- Choose warm white lights multicolor can look messy.
- Leave some clips empty for future memories.
14: DIY Desk Shelf from a Cutting Board

Your desk is probably small. Gain double the surface area by propping a large wooden cutting board on two small stacks of books or storage cubes. Slide your laptop underneath and put your lamp and coffee mug on top. It’s a two-level desk for $0–$10.
Tips
- Use heavy books or plastic risers as legs.
- Add adhesive rubber bumpers to prevent slipping.
- Choose a cutting board with a juice groove to hold pens.
15: Removable Vinyl Decals

Wall decals are stickers designed to be removed cleanly. Buy floral shapes, geometric patterns, or motivational quotes. Arrange them above your bed or desk to create a custom mural. Unlike posters, they lie completely flat and won’t fall down. Peel off one by one when you move out.
Tips
- Apply decals to a clean, dry wall for best hold.
- Use a credit card to rub out air bubbles.
- Start with one large decal instead of many small ones for less visual clutter.
Conclusion
Your dorm room is more than just a place to sleep it’s your study zone, hangout spot, and home-away-from-home. With these 15 easy DIY dorm room decor ideas, you can create a space that feels personal, organized, and inviting without breaking your budget or your security deposit. Start with one or two projects this weekend, then add more as you settle in. Which idea will you try first? Share your DIY dorm makeover photos with us in the comments!
FAQs
Are these dorm decor ideas actually renter-friendly?
Yes. Every idea uses removable adhesives (Command hooks/strips), peel-and-stick materials, or no adhesives at all. No nails, screws, paint, or permanent changes required.
How much should I budget for DIY dorm decor?
Most projects cost $5–20 each. To fully decorate an entire dorm room with 5–7 of these ideas, budget around $50–75. Many items like mason jars, cardboard, and pool noodles can be found for free.
Can I do these projects in a shared dorm room without bothering my roommate?
Absolutely. Focus on your side of the room first. Choose quiet, no-tools projects like washi tape art, fabric cork boards, or mason jar organizers. Avoid anything that requires hammering, glue fumes, or rearranging shared furniture.